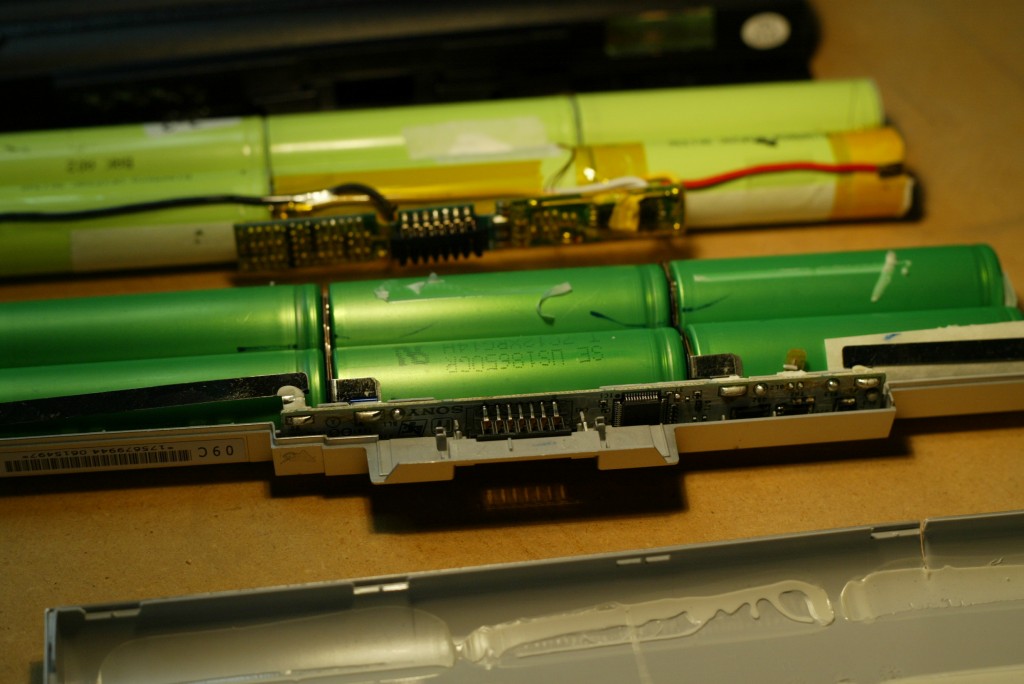
Sony VAIO FW series laptop battery hack
I’ve been trying to find a battery solution for my VAIO laptop, as I like the computer but the battery is toast. I can’t find anything that isn’t made in China and requires some third party BIOS flash to fool Sony’s lockdown battery check. Since I haven’t been able to find anything I decided to risk just changing out the cells in the original battery.
I bought a battery from Amazon and of course it wasn’t recognized by my laptop. So I tore it and the original battery down. They are pretty similar. Just remove the cells from the new battery and solder them into the old battery. Since the cells will have a charge, be extremely careful when desoldering and soldering on the controller board.
After putting the old battery back together with the new cells, it was recognized by my laptop. I did a couple complete charge / discharge cycles, and got about 3-4 hours of runtime on the batteries. The only problem I am having is that the charging controller appears to be preprogrammed for a particular voltage level, as the battery percentage is always a little off and the battery status is always “charging”. It appears to be looking for a cell voltage level that the new cells never hit. I assumed that the algorithm would be adaptive but it appears not. I’ve done probably ten full cycles now and the numbers are always the same.
*What I’ve figured out so far: the controller is a Renesas R2J240F10. It uses SMBus to communicate with the motherboard, which is near enough to I2C that I can use I2C to sniff the bus. However, without the chip datasheet I can’t do much with it since I don’t know how the data is mapped. I need the datasheet to be able to figure out what values to replace in the EEPROM.
**I’ve also figured out that the cells in the pack (SE US18650GR) are of the base type 18650 but 18650 must just be a generic specification because you can find a bunch of different voltages and chemistry for that number. Charge cutoff in particular would be important. I’ve measured the cells of both new and old batteries after resting for a few hours and they are within 0.01 volts. So I still don’t know whats going on, and not sure if buying the proper Sony batteries will help me either.
***I think the controller board itself is failing, since I put the original cells back in and they aren’t being charged even though the computer is reporting they are charging. Too bad I don’t have a schematic. I gave up and bought a used OEM battery.
BT5 USB flash drive persistent install
 Thanks to the computer systems security class I am taking for my masters program, I’ve been messing around with Linux for about a month now trying out different distros and figuring out the tools in Backtrack. BT is really useful but it’s annoying to always have to start from scratch with the live image, especially if you need drivers that aren’t included on the iso. A persistent installation is the way to go but I couldn’t get any of the methods I found on the web to work. I figured out an easy way that worked for me so I thought I would post it. › Continue reading
Fix your Keurig – again
So my Keurig decided to die again – this time it just started randomly brewing water onto the counter. The power switch didn’t work, so it got unplugged and when I plugged it back in the display just blinked “NOT READY”. It never became ready, and I was annoyed about the thought of having to shell out the cash for another one when this thing seems to break a lot anyway. So I ripped it apart to see if I could fix it. Turns out I could, and it was just a ten cent NPN transistor at fault.
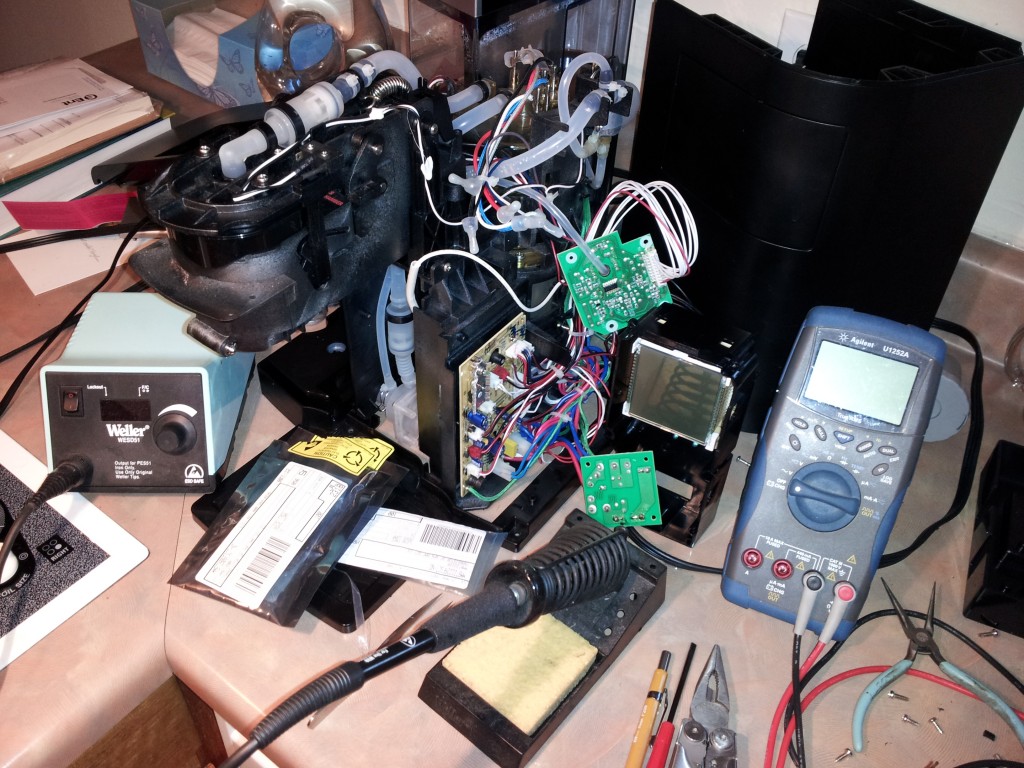
You have to completely tear down the machine to get to the control board. It’s actually a bit of a complicated affair considering that it’s really just a fancy water heater. The controller board is based on a PIC16F917. There are three other boards, one for the pressure sensor, one for the display, and an input power filter. The offending part in my case was on the back of the controller board. I did a little reverse engineering and figured out that the burnt transistor was an NPN, and controlled the valve that bled air pressure when the brewing cycle was finished, before the water tank is refilled. › Continue reading
Breathe life into your Xoom
A few months ago I bought a Xoom and have mostly been disappointed with it. I use it mainly for internet, which is slow on the tablet plus the interface and keyboard are laggy. There are other problems as well, like the “recent apps” button that doesn’t remember certain apps like the browser and I’ve found if you leave the device on for more than about a day applications start to behave oddly.
I’ve been thinking hard about selling it because I didn’t think that rooting it and installing a tweaked ROM was going to be enough to fix it. I decided to try anyway with the new Android 4 (ICS) release. It only took about five minutes using the Xoom with ICS to realize how wrong I was and how good Android 4 is for the Xoom. Everything is better.
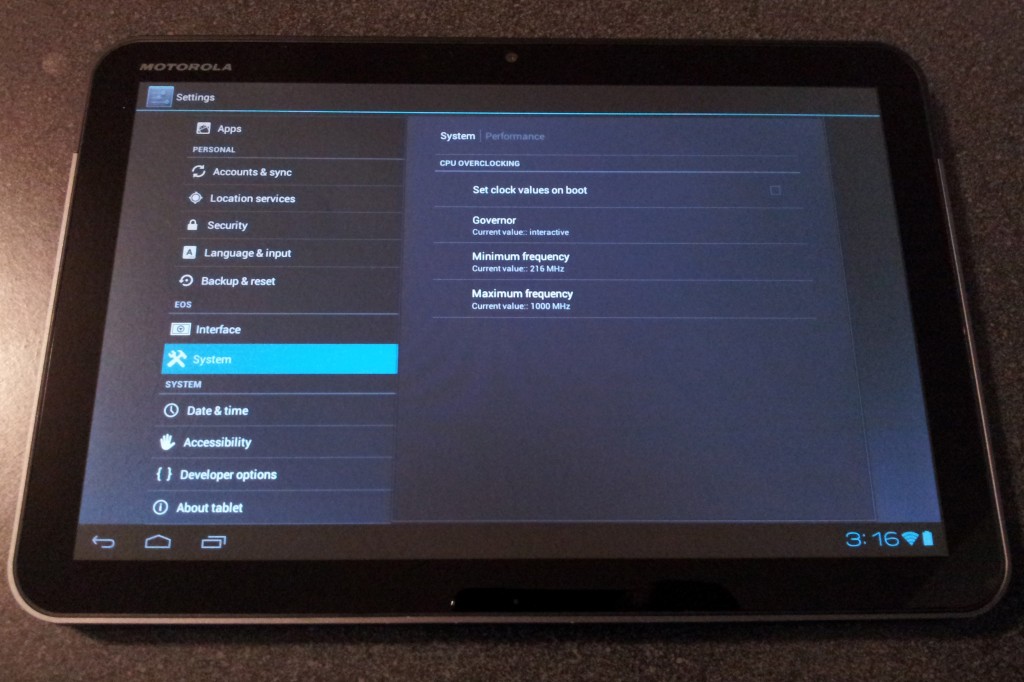
As usual with hacking all things mobile, you will be heading over to XDA if you want your Xoom to behave like it should. I’m writing a quick tutorial here since the information is pretty spread out on XDA. I had a couple issues that had me searching through pages of threads, so this is what worked for me. › Continue reading
PIC32 Ethernet Starter Kit and MPLAB X
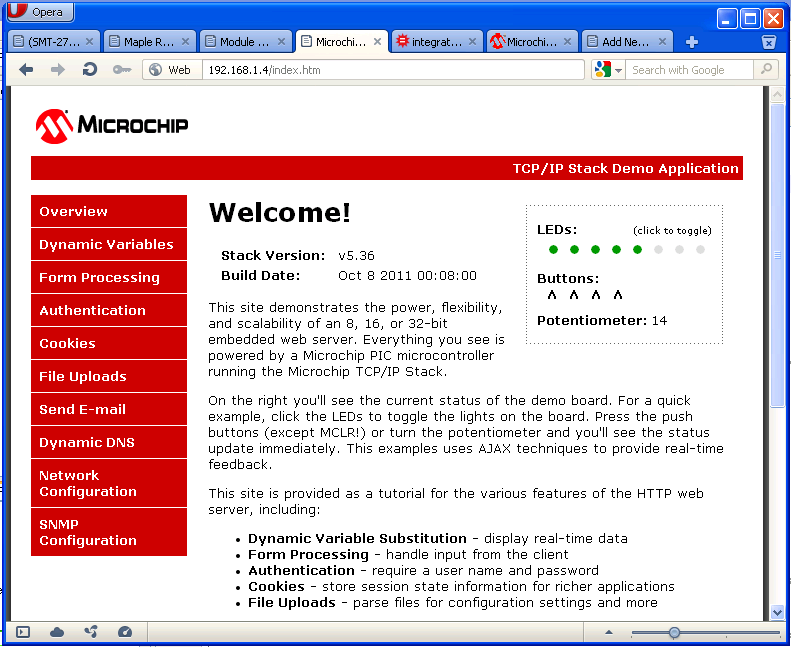
I picked up Microchip’s PIC32 ethernet starter kit in order to check out their 32-bit processors as well as to get started on embedded web servers. The free TCP/IP stack from Microchip was my motivation, since it can be used on any of their chips, including the 8-bit versions. I also was interested in the C32 compiler, since it is free. I used MPLAB X for the test, along with the downloadable Microchip application libraries. I have been using MPLAB X for PIC18 development, and I really like it. It’s a nice IDE.
This review will cover getting the SKDE up and running with the TCPIP Demo App from the application libraries in MPLAB X.
Netgear WGR614v7
I’ve reached the conclusion that this wireless router is pretty much useless. Despite my earlier efforts of heatsinking the processor (which did help), sending email logs when the log was full (unsure if that was useful at all), and updating the firmware to the latest and greatest the thing would still refuse to connect to the WAN randomly.
I did some more digging and figured out that the router doesn’t really have a WAN port, despite the port on the back being labeled as such. The switch controller is actually a six-port controller, and only five are used. Even though the WAN port on the router is physically separated from the other four ports, the switch controller sees it exactly the same as the rest. All five of the ethernet ports on the back are auto-sensing ports so any one has uplink capability. The polarity of the connection is tested during link or when more than three packets are received with inverted end-of-packet pulses. If any of the ports exhibit this behavior the switch controller reverses the port polarity and stores that status in a register. That port then becomes an uplink.
What I figured out was that if the switch ports are used for other devices, the router will eventually fail to uplink. That is, if you use it as an access point instead of a router, it’s fine. When you start using the switch ports it gets confused. I have successfully had the router running for a while by connecting my wired devices through a switch and then uplinking just the switch to port 2, with the router then uplinking to the gateway. Evidently the router’s processor has an issue with its mapped memory.
I’ve now bought a Linksys E2500 wireless N router to replace this thing. You can get refurbished wifi routers at Cisco’s store for about half price.
ELM327 emulator
I’ve been wanting to get diagnostic data from my truck for quite a while, but I haven’t wanted to spend the big bucks on the tools. Recently though I came across the ELM327. It’s an all-in-one IC solution for a scan tool. It even has a UART. You just need a few external parts for different COM interfaces and an OBDII connector. However, the IC itself is $32.50, and you still have to source the OBDII connector, create the schematic, do the layout, make the board, etc. So I decided to try one of the “ELM327 based” products off eBay. It was $20 shipped from Hong Kong, and already has a USB interface.
The product is based on a PIC18, with an FTDI FT232R serial to USB converter. Use FTDI’s driver when you connect it to your PC though. I used the driver included on the CD that came with the tool, and it enumerated as a “high speed USB serial UART” and wouldn’t communicate. I had to use FTDI’s driver removal tool to get rid of it so I could reinstall the correct one.
I tried the device on my truck with a couple different software programs: ScanTool.net, OBD2Spy, and wOBD. However the results were underwhelming, as I got two different sets of codes with the first two and the last program wouldn’t communicate with the tool. ScanTool.net reported P0403, P0405, and P0460. OBD2Spy gave me P0204, P0304, and P0500. Obviously that’s not very helpful.
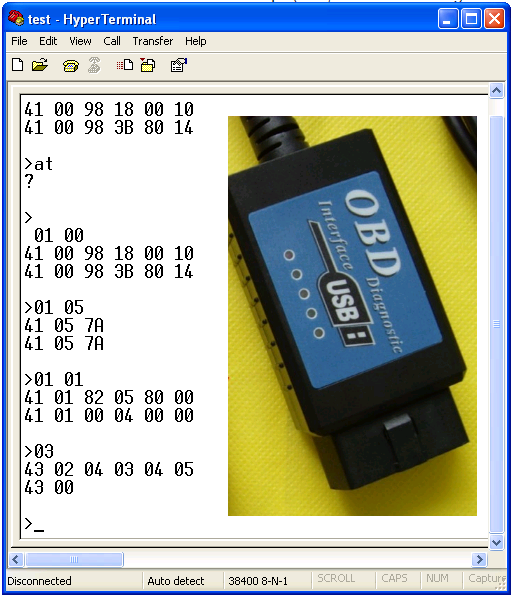
So I opened up the ELM327 datasheet and Realterm. Realterm is always my favorite terminal program, but in this case I had to switch to Hyperterminal since Realterm doesn’t have the “Append line feeds to incoming line ends” feature. Realterm overwrites everything from the device on the same line.
I started with a simple protocol test, to make sure everything is working. Then I tried pulling PID 05, which is coolant temperature. It responded with the proper value. So I moved on to checking the number of codes. There were two. Finally I pulled those codes. They turned out to be P0204, P0304, and P0500. I’m not sure why the ECU thought there was two codes but listed three. Anyway, OBD2Spy gets the nod here. If you look at the output you can see that the other program was off by one byte, which is why the codes are similar but incorrect.
So the emulator works as advertised, at least in this test. The next problem though is that there are only a handful of previously defined PIDs that auto manufacturers use so that they can get diagnostic tool companies to pay for the extended PIDs required to actually do any useful troubleshooting. In order to get real-time data of detailed systems, you have to pay for software that has the extended PIDs.
CNC version 2.0
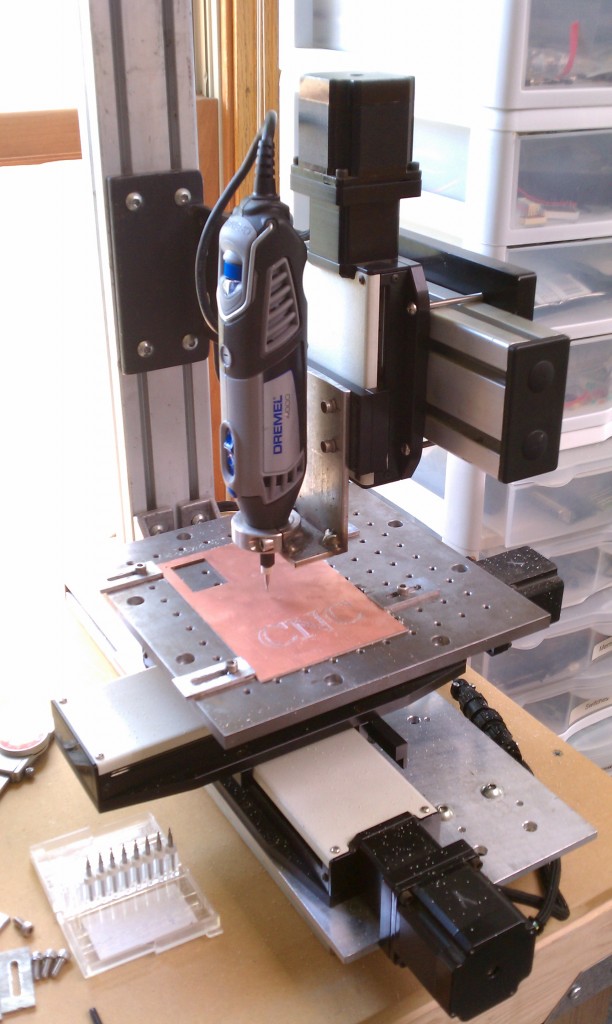
I finally finished putting together my second CNC machine. Again this one is put together with surplus parts, but they are much better surplus parts. I have the luxury of three linear slides from Newmark Systems, that have dual profile rails and recirculating ball slides, along with 16TPI precision screws and recirculating ball guides. In short, the new machine is solid as a rock, and has more torque.
Netgear wireless router repair
My wifi internet connection has been slowly deteriorating. I originally thought it was my trusty old IBM T42 going out, but when I got my Alienware M15x it was still bad with that machine. I’ve had a few problems with this router: it sometimes refuses to allow wireless connections to access the gateway. If you log in to the router’s interface over wifi via it’s IP and clear the log, it will then allow wifi access to the gateway. I set up the router to automatically email the log to an email address when the log is full. That worked for most of the time, but occasionally you still have to log in and do it manually.
Recently though the connection speed over wifi plummeted. I was going to buy a new wireless AP, but I’m pretty cashed at the moment so I took the router apart to see if I could buy some time.
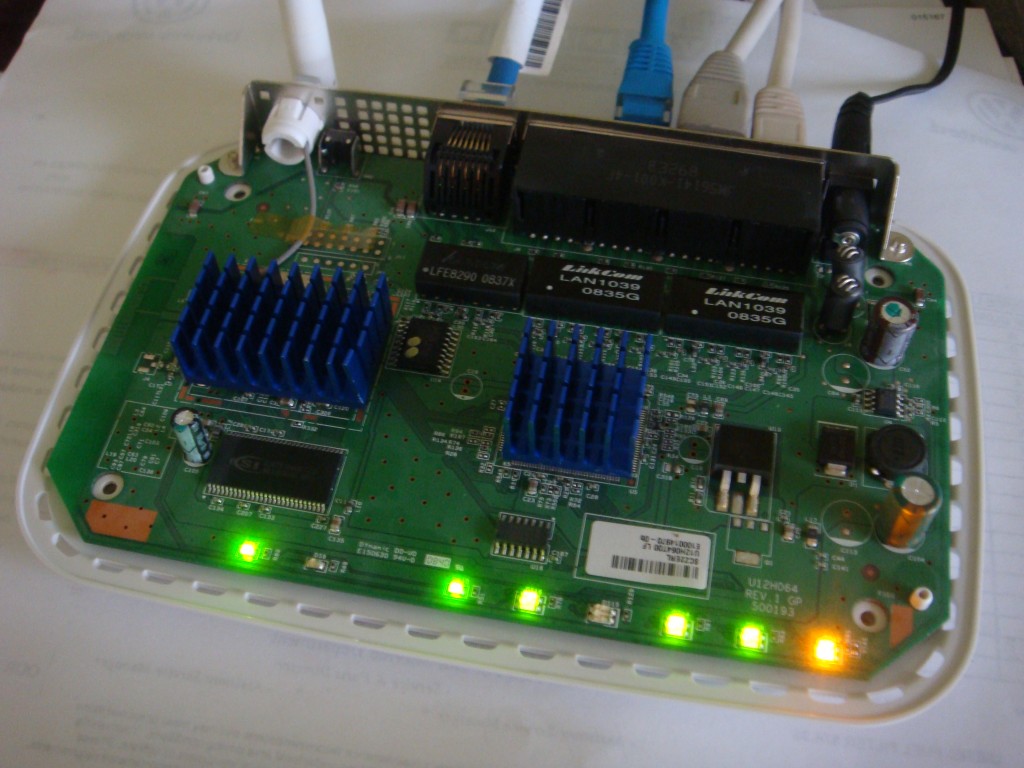
You could pretty clearly see that the microprocessor has overheated. The conformal coating is brown on the bottom side of the PCB. I used an infrared thermometer to measure the temperature of the chip, it was running at about 74°C. The ethernet switch controller IC had a similar temperature, but it’s a larger leaded package whereas the CPU looks like a BGA package. I had some memory heatsinks that I cut to fit the two chips, and with that and some thermal paste I had heatsinks for the two heaters in my router case. They are low profile enough that the case will still go on.
My router works like it should again: speedtest.net reports an average of 18Mbps download speed. The heatsinks keep both ICs at about 49°C now. Guess I won’t need that new AP for a while.
Canon DSLR shutter release from any switch contact
I’ve long wanted a TC-80N3 remote release for my EOS1D for the long exposure and intervalometer capability. Unfortunately a real Canon one is at least $150, and just out of principle I’m not paying that. A couple months ago I decided to just try one of the identical but rebranded ones off of eBay for $20. Ships from Hong Kong, Shenzen, etc. so it takes a while to get here, but it works, so I’m happy. I can never leave well enough alone though, so I took it apart and added a jack so I can hook anything with a switch contact to my camera and let it take a picture.
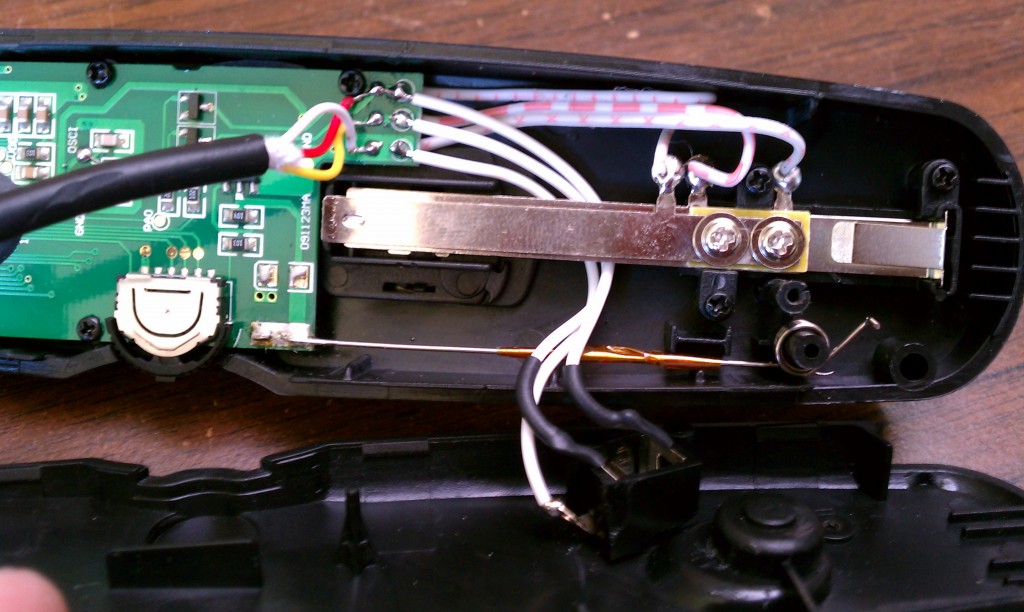
It’s pretty straightforward, there’s three metal contacts. The lowest one is ground, the next one is prefocus, and the last one is the shutter release. The signals are active low. I wired the three to a headphone jack on the bottom of the remote. To test it out I bought a ten dollar motion sensing security light and took out the motion sensor, then wired the output of the sensor to a 120VAC relay. The relay contacts trigger the shutter whenever the motion sensor sees anything.
You can use anything with a switch contact to trigger the camera, just remember that it’s not protected. If you mess up, you can easily fry your camera. Look for “dry” contacts if you are unsure. Canon DSLRs might allow for transistor pull-downs, but I haven’t tried that. It’s easier to just create an isolated contact through a relay for the safety of your camera.
Other Stuff
Recent Posts
- 6CY7 dual triode valve amplifier
- Air quality sensor (TVOC and eqCO2)
- Automotive rear fill “surround sound” with Boss DD-3
- Spring tester / weight scale
- Ducati 749/999 Tail Light
- Instruments for the GSXR
- Light pipe tail light for the GSXR
- M17x 6990m / 6970m overheating
- PAR / Spectrum analyzer
- Acrylic polishing and scratch removal
Archives
- May 2019 (2)
- April 2017 (3)
- October 2015 (1)
- May 2015 (1)
- March 2014 (2)
- December 2013 (1)
- July 2013 (1)
- November 2012 (1)
- October 2012 (4)
- September 2012 (1)
- August 2012 (3)
- June 2012 (1)
- March 2012 (1)
- February 2012 (1)
- January 2012 (1)
- October 2011 (3)
- July 2011 (1)
- June 2011 (3)
- May 2011 (2)
- April 2011 (1)
- December 2010 (1)
- August 2010 (1)
- July 2010 (3)
- April 2010 (2)
- March 2010 (2)
- January 2010 (2)
- December 2009 (2)
- October 2009 (2)
- September 2009 (1)
- August 2009 (15)
