My homebuilt CNC machine
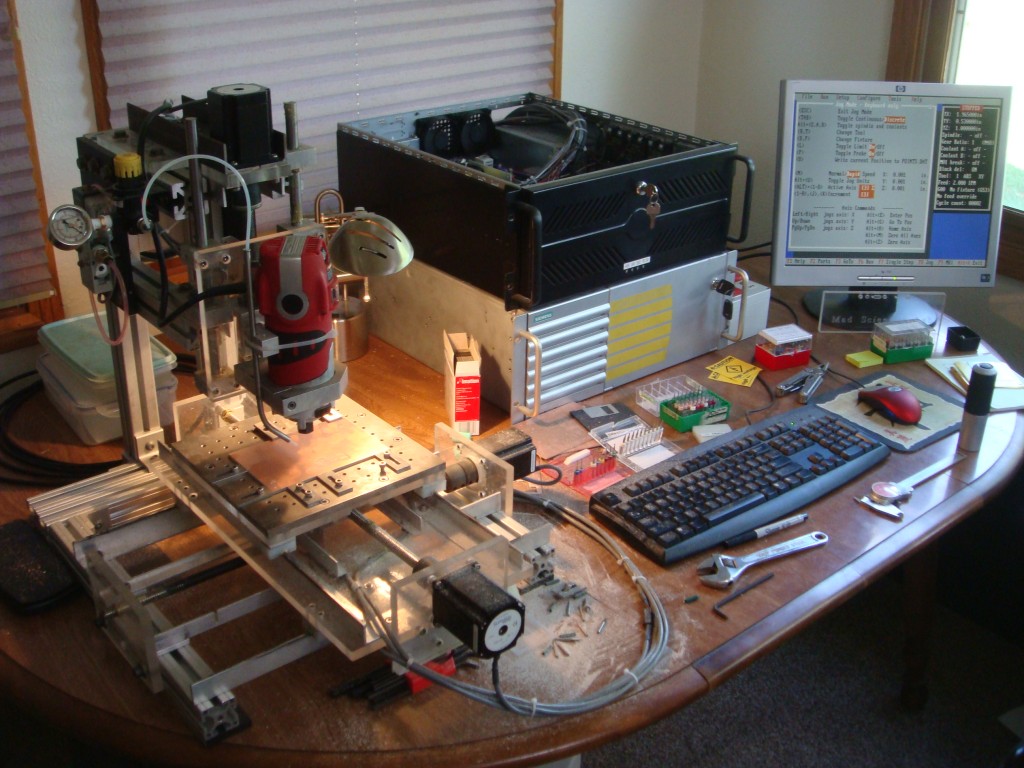
I finally assembled enough surplus parts and scrap material to build a halfway decent CNC machine. I have been looking forward to actually completing this task for some time, but the appropriate parts and materials are prohibitively expensive for the individual on a budget. This spring I managed to complete the project.
Most of the machine is made out of either aluminum or acrylic. These materials are both easy to work with when all you have available is various hand tools and a drill press with a cross slide vise. The motors are NEMA 23 high torque, the threaded rods are 1/2-10 precision ACME and the nuts are anti-backlash. This results in pretty decent X-Y movement. I made the slides from extruded aluminum profiles available at the hardware store and some strips of Teflon.

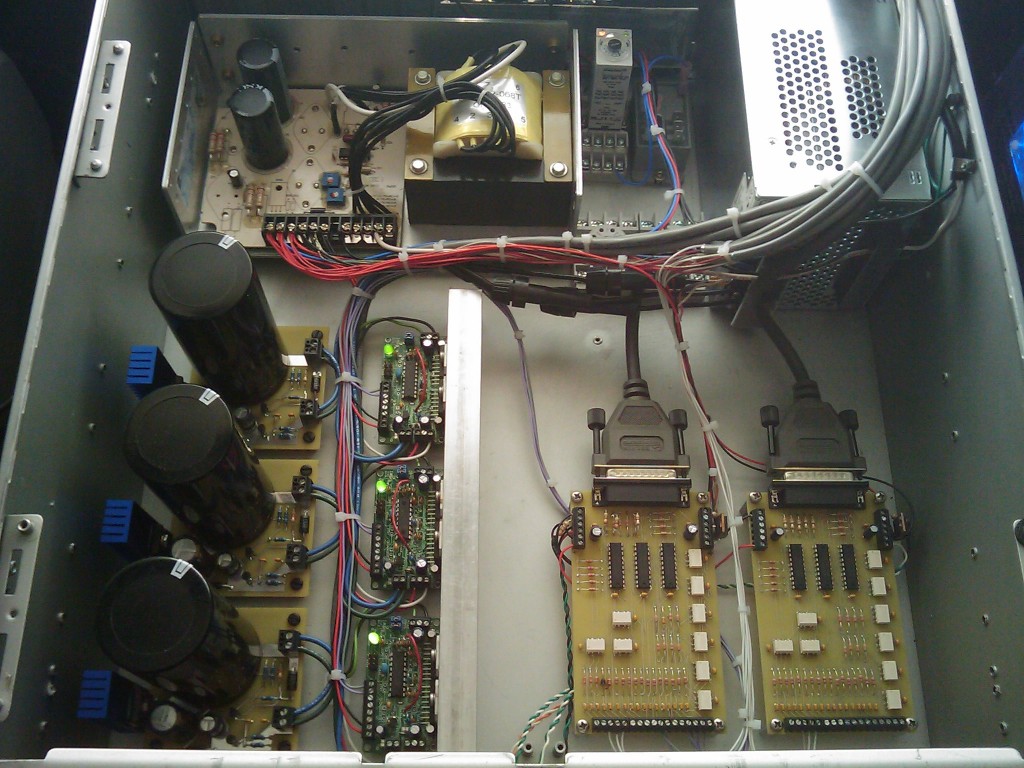
I made all of the electronics that support the machine. I made the optical home and limit switches, as well as both parallel port interface boards. I also assembled the stepper motor drivers and built power filters/regulators for the input to the stepper motor drives on all three axes. This prevents inductive feedback spikes from the motors ruining the stepper motor control ICs. I need this because I’m running the motors at 48VDC and the controller IC has an absolute maximum voltage rating of 60VDC. I also wanted to keep any switching noise and voltage dips from the switch-mode power supply out of the stepper drives. Each filter has a FET-regulated output that clamps the voltage and then sends it out to some big capacitors to prevent the voltage from dropping.
The parallel interface boards completely isolate the controlling PC from the drives and other electronics. Buffers handle all the appropriate levels and opto-isolators keep the ports safe.

I’ve run it extensively with TurboCNC, but I don’t get any of the limit and home functionality because TurboCNC only supports legacy port addresses, and most parallel port PCI cards can’t map to legacy addresses. This leaves me with only the one on-board parallel port, which is mostly used up by the 3 axis step and direction signals. It works in Mach3 CNC, but I can’t afford to buy that program right now. So I’ve used it in evaluation mode for doing simple text engraving on plastics and acrylic. Oddly enough I couldn’t get it to work at all in Mach2. The pulse train output to the stepper drives was inconsistent enough that the motors would stall. I even tried it on a few different computers, one of which was a brand new XP install.
The machine mostly cranks out PC boards thanks to Eagle CAD and PCB2GCode. I’ve made quite a few since the machine was finished. It does a pretty good job, and holds flatness to a couple thousandths. It’s enough to get routine 0.020″ isolation on traces and pads, and clean 0.012″ trace widths. It’s a bit slow because of the low-buck slides, the motors stall if I speed it up much. It’s not exactly a high precision machine, so I can live with slow.
I’ve got some better parts since I built this one, and I’m planning on building another one with much better accuracy in the near future. This machine won’t handle the fine traces necessary to make boards with the newer components.
Here’s a video of the machine in action:
You can see more videos at youtube: imsolidstate’s CNC machine
14 Comments to My homebuilt CNC machine
Leave a Reply
Other Stuff
Recent Posts
- 6CY7 dual triode valve amplifier
- Air quality sensor (TVOC and eqCO2)
- Automotive rear fill “surround sound” with Boss DD-3
- Spring tester / weight scale
- Ducati 749/999 Tail Light
- Instruments for the GSXR
- Light pipe tail light for the GSXR
- M17x 6990m / 6970m overheating
- PAR / Spectrum analyzer
- Acrylic polishing and scratch removal
Archives
- May 2019 (2)
- April 2017 (3)
- October 2015 (1)
- May 2015 (1)
- March 2014 (2)
- December 2013 (1)
- July 2013 (1)
- November 2012 (1)
- October 2012 (4)
- September 2012 (1)
- August 2012 (3)
- June 2012 (1)
- March 2012 (1)
- February 2012 (1)
- January 2012 (1)
- October 2011 (3)
- July 2011 (1)
- June 2011 (3)
- May 2011 (2)
- April 2011 (1)
- December 2010 (1)
- August 2010 (1)
- July 2010 (3)
- April 2010 (2)
- March 2010 (2)
- January 2010 (2)
- December 2009 (2)
- October 2009 (2)
- September 2009 (1)
- August 2009 (15)
If I ever get around to it, I’ll be begging for boards – the remote switch we talked about.
Have you looked into using Linux CNC? Might be a better alternative to Mach3
http://www.linuxcnc.org/
I’m salivating as I pour over your CNC milled boards. I’m tired of dealing with toner transfer and cuperic chloride etchant and hope to some day build my own mill.
I see you drill the through holes first. Do you use the same hole dimension for all holes and is there any trouble with aligning the traces to the holes after changing bits?
Thanks Mike. My similar frustration with etchant and the toner transfer/ sharpie touchup technique is what motivated me to build my CNC. Actually, now that I reminisce of those days, I remember it was the drilling that really sucked.
I drill the holes first so there’s no risk of tearing up a pad if it’s small, like a via. I use typically three to four different size bits when I’m making a board. I use a 0.03″ bit for the vias, a 0.045″ bit for the ICs and other through-hole stuff, and a #4 or #6 clearance bit depending on how I’m mounting the board. Some power components take up to a 0.08″ bit, so the number of bits is dependent on the components you use.
There isn’t any issue with realignment during a bit change because EagleCAD stops and returns the machine to it’s origin and requests a tool change before continuing the program. The only alignment problem is when you flip the board, you have to manually re-align to X0,Y0. I usually drill a hole at X0,Y0 before I do anything to serve as an origin. If you’re doing a single layer board you don’t have that hassle, but you only have pads on one side of the board.
There’s definitely some tricks that I’ve worked out, so maybe I will do a step-by-step with some pictures on my next board.
I’ve never made the jump to linux. I think EMC is supposed to be a good CNC program for linux too.
You did an excellent job, Any chance of releasing the build info and gerber files?
What is the frame extrusion that you used? It has a funny Angled-X Profile. Is that a McMaster-Carr purchase?
I think it’s Bosch. You can get it at McMaster, but it’s 80/20 brand. Generically, it’s called extruded aluminum profile or t-slot profile. Check out 80/20’s catalog for all the stuff you can make with it. http://www.8020.net.
Yeah we have some carts and equipment that uses the 80/20 stuff. Its rock solid when you think it wouldnt be. Well engineered!
are you by chance making available the schematics for
My homebuilt CNC machine project ?
Good job! Your CNC machine is amazing! I would like to know a few questions: How much did it cost? Are you planning to publish step by step instructions?
Thank you!
You might be able to get that to work mach2/3 if you switch to sherline half step mode.It worked with my homemade cnc mill. I use econo-stepper controller from ECS. These controllers will not work with mach2/3 unless you change that setting in the ports+pins config.It sounds like you have a similar problem. Mach is the best CNC software I have seen yet.
Thanks! I’ve posted the electronics part. If I get some time in the future, I might post how I built the mechanical parts.
Thanks for the tip, I’ll look that up.