Fix your Keurig – again
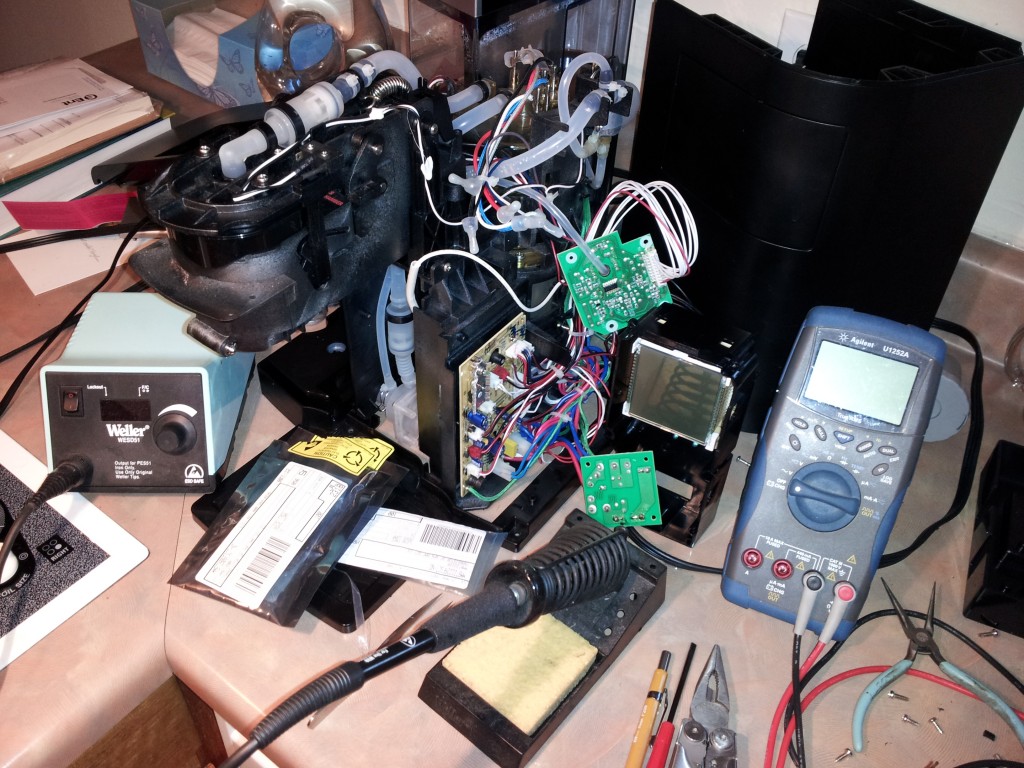
So my Keurig decided to die again – this time it just started randomly brewing water onto the counter. The power switch didn’t work, so it got unplugged and when I plugged it back in the display just blinked “NOT READY”. It never became ready, and I was annoyed about the thought of having to shell out the cash for another one when this thing seems to break a lot anyway. So I ripped it apart to see if I could fix it. Turns out I could, and it was just a ten cent NPN transistor at fault.

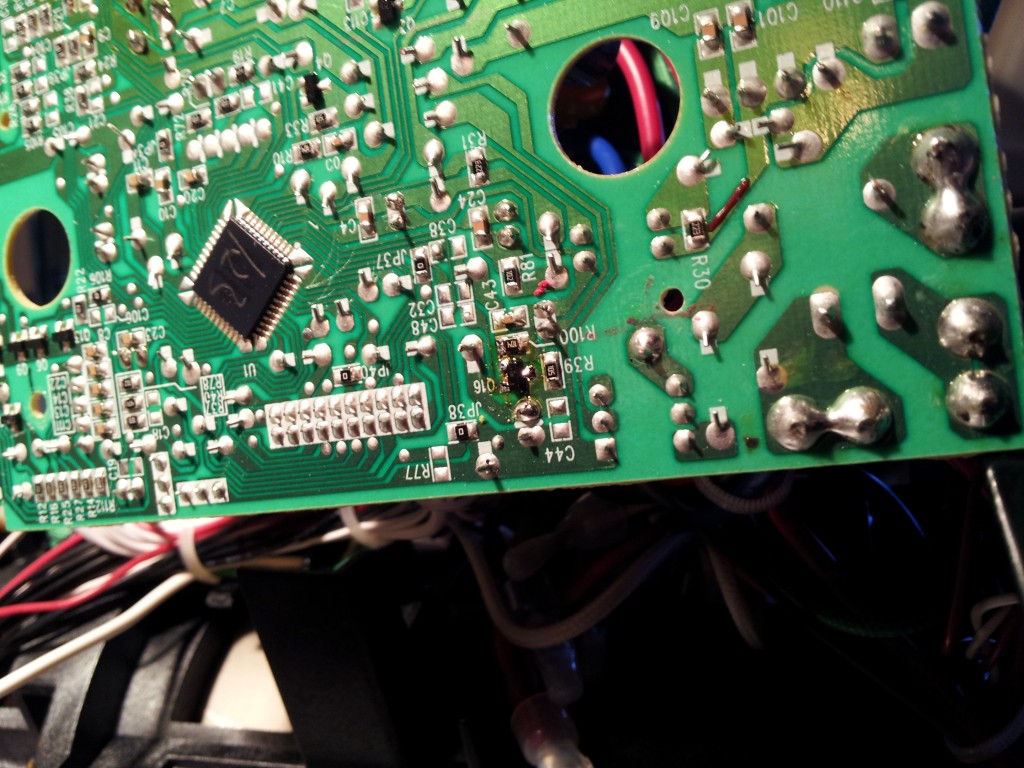
You have to completely tear down the machine to get to the control board. It’s actually a bit of a complicated affair considering that it’s really just a fancy water heater. The controller board is based on a PIC16F917. There are three other boards, one for the pressure sensor, one for the display, and an input power filter. The offending part in my case was on the back of the controller board. I did a little reverse engineering and figured out that the burnt transistor was an NPN, and controlled the valve that bled air pressure when the brewing cycle was finished, before the water tank is refilled. A voltage test confirmed this and showed 12 volts at the solenoid, 5 volts at the micro pin to trigger the solenoid, and the circuit is completed through the NPN’s emitter connection to ground. I soldered a new MMBT2222 transistor in place of the blown one and powered it on to see if it worked. The lights came on and the pump started up, so I shut it off and put it back together. Then I brewed myself a cup of coffee.
I’m rusty on my transistors, but if I remember right the 2N2222 is one of the more hardy transistors, so hopefully this one lasts longer. I can’t figure out why that one died, unless the one that was originally there was really inadequate. There is already a clamping diode across the transistor to protect from the solenoid valve’s back EMF.

It’s really too bad that the Tassimo got bogged down in the politics of what brands they were going to offer, because the Tassimo is a much better machine. I brewed a ton of coffee with my Tassimo with just one descaling. Unfortunately you can pretty much only get Maxwell House for the Tassimo anymore. So I guess I’m stuck fixing my Keurig every six months or so.
7 Comments to Fix your Keurig – again
Leave a Reply
Other Stuff
Recent Posts
- 6CY7 dual triode valve amplifier
- Air quality sensor (TVOC and eqCO2)
- Automotive rear fill “surround sound” with Boss DD-3
- Spring tester / weight scale
- Ducati 749/999 Tail Light
- Instruments for the GSXR
- Light pipe tail light for the GSXR
- M17x 6990m / 6970m overheating
- PAR / Spectrum analyzer
- Acrylic polishing and scratch removal
Archives
- May 2019 (2)
- April 2017 (3)
- October 2015 (1)
- May 2015 (1)
- March 2014 (2)
- December 2013 (1)
- July 2013 (1)
- November 2012 (1)
- October 2012 (4)
- September 2012 (1)
- August 2012 (3)
- June 2012 (1)
- March 2012 (1)
- February 2012 (1)
- January 2012 (1)
- October 2011 (3)
- July 2011 (1)
- June 2011 (3)
- May 2011 (2)
- April 2011 (1)
- December 2010 (1)
- August 2010 (1)
- July 2010 (3)
- April 2010 (2)
- March 2010 (2)
- January 2010 (2)
- December 2009 (2)
- October 2009 (2)
- September 2009 (1)
- August 2009 (15)
Have you ever needed to replace the air pump in your tassimo? I am trying to find a replacement air pump for my tassimo because it gradually got weaker and weaker, and now doesn’t foam milk and leaves lots of water in the T-disc. The air pump motor works fine, it is just the rubber diaphragm parts have worn out and don’t seal well.
hi my name is randy and i have a question… i am tring to repair my b70 from keurig and i took apart the machine to find my power issue. i have now tracked down the transformer not working so i replaced it, however in the process of tracing i unpluged all my wires to the board and forgot to take a pic before i did this. can u maybe tell me the right ones or take a picture showing the circuit board clearly thanks
I’m in the middle of a hack on my keurig B60 (ke425/611 control board) to tap into the low water signal as a trigger to an automatic refiller. I was looking for a 5v power supply when I accidentally shorted a couple jumper wires in the middle of the main control board near jp24 and jp25. A small but noticeable spark and it’s dead! It won’t turn on and there’s a noticeable electronic toast smell near the board edge where the capacitors are. I’m weak at troubleshooting boards – any tips? Follow the smell and try to check the caps in circuit? Go after the sensitive devices like the 5v or 12v regulator or the few transistors? Or are there some test points?
I think I may have the same issue. Not Ready is displayed and the solenoid is powered on as soon as you plug in the unit. Can you please confirm if the transistor was shorted or open? Thanks.
Hi there. I’m looking for someone to help identify all of the different messages that appear on the LCD of my B60; ie that events trigger each message. Is this something you might be able to help with? Thanks
I have a Cuisinart SS-700 Keurig and I am trying to up the voltage to the air pump. Any ideas. It has poor air preassure. I have oiled the pump and it was fixed for 20 cups or so. Might sound crazy but I need to put out a bit more air pressure. Thank You.
I have 2 of these k155s. 1 is about 5+ years newer. The older board is green and has hand written markings. The new k155is blue and seems more mainstream production. No hand markings.
My new k155 died after a power outage. When power was restored the unit just clicked repeatedly. The screen backlight was on bright but no image, just clicking.
I disassembled both units(pics/steps on google drive.
My plan was to swap the old working board into my new k155 to get the house coffee maker back up asap and then troubleshoot and repair the new board at my leisure. This way i could test more and get some good pics for a fix it guide.
Both boards have the same connectors and mounts but the screens are not compatible. With the old board installed, my new k155 screen did not work. It lit up but no display. Something changed that the old board cant communicate with the newer screen. So i was forced to use the old board with its matching old screen(and weathered bezel) in my new k155 with all other parts being from the new k155. No biggie.
My failure and loud clicking was from 2 dead 1000uf capacitors. I also tested a lot of other components on the board and found a 1.5uf safety cap testing well below so i replaced that as well.
I haven’t had any transistor issues so far but they are buzzing a bit on the new board so thats probably next.
The old K155 was pretty reliable. It needed a solenoid kit and then a year later the pump had issues and the water lines were old so it became a parts machine and sat in my shed 4 years until the new one died(finally paid off saving it lol). Im posting a disassembly guide on i fixit along with all the pics on my google drive.
https://drive.google.com/drive/folders/14bh3SowaC4WB5jxOu9v-eIednZCnwR3o?usp=sharing